Greg DeWald
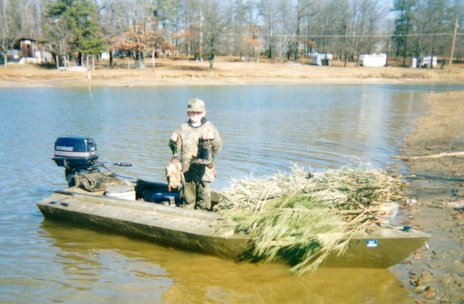
My son and I hunt the reservoirs, rivers, and the sounds in N.C. This water is greatly varied in size, ranging from 4" deep muck swamp potholes to the Pamlico, which is huge water. No doubt that there is no one design boat that can handle this swing in water size. At times, in the swamp and small creeks, wished I had my little hunting kayak, while on the sounds with the wind blowing, wished I had a freighter. However, overall, this rig which I built in 94, has served us very well. It is small enough to disappear on a bank hunting mallard, works well on open big water diver hunting, and with spray shield up, can take on rough water which is a regularity on the sounds.
This boat is an old fashioned design sneak box which is built upside down on a floor jig.
Some general dimensions of the hull are:
length 13'4"
beam 60"
width @ bottom 48"
max depth 16"
vertical height at deck edges 11"
type bottom flat
bow shape v
transom ht 16"/20" to suit your motor
box width 30"
box length 78"
rib spacing 24"
keel 1.5" wide 1.25" ht.
transom thickness 2.12"
weight swag-lbs approx. 275 lbs
The plan for this boat was sketched up after looking at a similar boat of a fellow hunting friend, and since it is not a purchased plan, have attached the same sketch, should you be interested to build such a design. Hopefully, you could also share your designs on this board as well.
The rear ward ribs are identical in size, made of red or white oak and gusseted with .25 ac fir. No. 6 rib is same height, but 1" narrower to allow the chines to flow more easily into the bow piece. The forward ribs are framed in to fit the chine curves. The bow piece is a red cedar tree root cut out with a chain saw and worked down to size. A cypress root would work well for this too. The material I like best for the chines and stringers are red oak. You get this wood rough sawn approx 1.12 thick from an old fashioned country sawyer, and you get it green(fresh) as possible. Saw it to the right width by about 1" thick on your table saw or planer, and then throw it back in the creek for a week or so to get it sopping wet. This allows it to bend easily without steam or fear of cracking it.
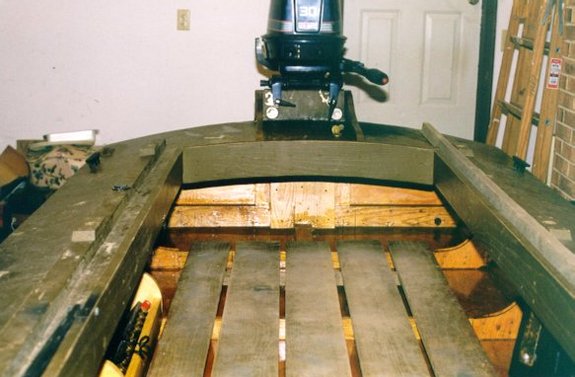
The transom was made by laminating .75 and .5 plywood together with glue and screws, and then framing it on the inside with 1x4 oak. A 1x14 oak board is glued and screwed on the inside face of the transom @ center, you can see it in the photo. A 1x10 doubler board is screwed on top of it.
Build your jig out of straight 2x4's, attach the bow piece, center chine, ribs, and transom to the jig, then attach the corner chines and deck stringers to the ribs. The chines and stringers are cut carefully on you table saw with a long scarf like cut that allow perfect mate up to the bow piece. You will have to make this cut several times to get it right, so, you want extra length on the stringers for this purpose. The best screws I think to use are hardened #8 phillips screws and all joints are glued and screwed. Use plastic resin glue.
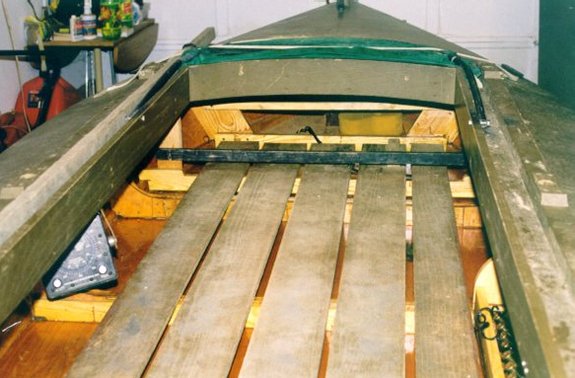
The sides are .25 or 3/8 fir plywood, use marine grade if you like, screwed with drywall screws or a 3/4 #6 stainless screws and glued in place. A hand held power planer makes fast work out of fairing the chines to accept the plywood. The bottom pcs are 3/8 marine plywood. No 4 or 5 rib is a double thickness rib to allow a solid but joint on the bottom. Use a .75 oak butt block for the side joints or you can just layer on the glass on the inside instead. Next, you remove the hull from the jig, flip it over, frame in the deck stringers, and cover it with .25 ac fir ply. Frame in the box opening with 1x6 oak.
The whole hull is then covered with glass. I like the glass mats in favor of cloth because it gives thickness and more strength in one fast coat. It is also rough in appearance and tough as all heck. Don't use this if you want a slick sanded surface.
I built a 20" transom on this boat to accept my fishing motor which is a 30 hp. With a full load -2 people, dog, and stuff, the boat runs very smooth @ wide open throttle, however, with lighter loads, I have to back off the throttle to approx. 1/2 -3/4 or it will go in to a skip jack hop, which is really no problem. Suffice to say, a 30 really moves this boat and the hull is more than capable of this rating.
On both sides of the box, a 2x4 oak board is screwed to the deck, and drilled to accept 3 poles that are covered with canvas and net, which hold the bamboo seen in the photo. Small pine trees are mounted on each corner of the box and next to the motor.
If I had it to do over again, would I build it the same way? - absolutely What would I change? -probably would reduce the rib spacing to 16"(add more ribs which I showed in the plan)
One of the best parts of this boat is the cost. In 94, the total cost was <$700, I would say today it is still < $900, and much cheaper if you use ac fir. The only thing you might buy from a lumber yard is plywood and screws. Try Jamestown supply for glass, mat, and hardware, and all other wood can be rough sawn green oak. Around here, you pay $.35-.40 /board ft for this wood. The lumber yards are 7-10x this price and you can't get what you need.
When I built this boat and previous ones, it was before the web was around, so it was almost impossible to find anybody that was in to boat building. Thanks to Eric and this board, now you can get lots of info that formerly took forever to find. Hopefully, by sharing this, you might get an idea, or a good hoot out of a mistake. In the mean time until next year, I think I'll grow one of those glorified sink box's in my garage.
Good luck and leave some flying for me!