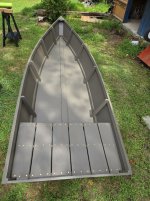
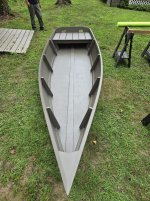
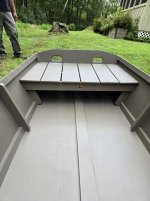
Rail Skiff Build

SJ~

Elegant solution! (One I have used in my gunning coffins forever....) I use my router to round the edges after I 'glass the outside.
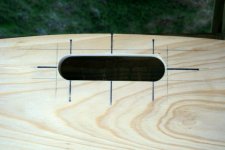
sm 10. Do not round edge of hand hole until after glassing. STRAIGHTENED.jpg

From the same design school: Howzabout boring a hole (5/8" or 3/4"( crosswise through your stem/cutwater? It's an old idea - but from the pre-trailering days. It was intended for a painter, nicely eye-spliced into place. Here is one on an old Great South Bay Scooter:
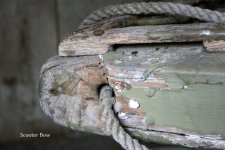
Scooter Bow captioned - with bored hole for painter.jpg

The painter should thick enough (half-inch?) for a comfortable hand hold AND just short enough so it cannot foul in your prop.... You may want another eye-splice on the leading end - or a whipped end tied in a figure-8.

BTW: If you think you may anchor this vessel, I would mount a 6-inch cleat (oriented vertically) inside the boat - on your "vertical trim" piece. A deck fairlead - or a bit of leather tacked in place - could prevent chafe.

All the best,

SJS
 
SJ~

Columbo.webp

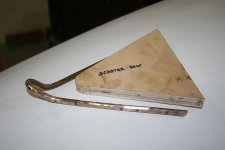
On my Scooter, I did not want to penetrate the new 'glass skin and give moisture a ready pathway inside. So, instead of boring crosswise, I made this bronze loop - for both my bow anchor and my trailer hook.

sm 7 - Ready for installation.jpg

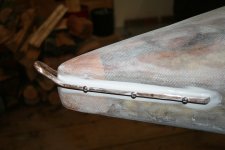
Smaller screws and lots of 3M 5200 for bedding. On youre vessel, the aft fasteners could be machine screws through the plywood. The soft bronze is easily ground (sanded, actually) off inside for safety. and finished appearance.

sm 10 - Caulk is smoothed around fairlead..jpg

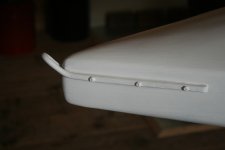
It has served me well.

sm 3.jpg

All the best,

SJS
 
SJ~

Elegant solution! (One I have used in my gunning coffins forever....) I use my router to round the edges after I 'glass the outside.

View attachment 67209

From the same design school: Howzabout boring a hole (5/8" or 3/4"( crosswise through your stem/cutwater? It's an old idea - but from the pre-trailering days. It was intended for a painter, nicely eye-spliced into place. Here is one on an old Great South Bay Scooter:

View attachment 67208

The painter should thick enough (half-inch?) for a comfortable hand hold AND just short enough so it cannot foul in your prop.... You may want another eye-splice on the leading end - or a whipped end tied in a figure-8.

BTW: If you think you may anchor this vessel, I would mount a 6-inch cleat (oriented vertically) inside the boat - on your "vertical trim" piece. A deck fairlead - or a bit of leather tacked in place - could prevent chafe.

All the best,

SJS
Like you, the boat is already glassed. I think it's easier than messing with the glass around a penetration.

The original boat has a hole through the stem. There isn't enough meat in the stem of this boat for a hole which I would feel safe using, or I would have done it.

I've already messed with the idea of a cleat on that vertical piece. A cleat mounted there is Plan B if I don't become comfortable drilling for the bow eye. I believe we will tow this boat to some of the hunting spots. As with the stem, the trim is a little shaky to trust with a line sufficient to tow, plus the chafe potential as you mention.
 
May as well throw my hat in the ring. On my Poleboat, I used pvc tubing secured with homemade epoxy putty and some cloth reinforcement on the inside. RM20250710_152644.jpg
 
SJ~

View attachment 67213

On my Scooter, I did not want to penetrate the new 'glass skin and give moisture a ready pathway inside. So, instead of boring crosswise, I made this bronze loop - for both my bow anchor and my trailer hook.

View attachment 67214

Smaller screws and lots of 3M 5200 for bedding. On youre vessel, the aft fasteners could be machine screws through the plywood. The soft bronze is easily ground (sanded, actually) off inside for safety. and finished appearance.

View attachment 67215

It has served me well.

View attachment 67216

All the best,

SJS
Steve,

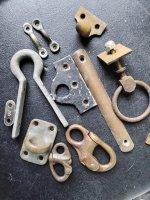
Was that a common item? Saw a similar bow loop on Ebay.
1753378434085.jpeg
 
Good morning, Rick~

Actually, I dreamed up the loop for my Scooter - necessity being the mother of invention and all.... It certainly provides more proof that "There is nothing new under the sun."

I always regard such coincidences as "convergent evolution". Given a set of design criteria, many different workers will arrive at the same/similar solution - independently.

All the best,

SJS
 
May as well throw my hat in the ring. On my Poleboat, I used pvc tubing secured with homemade epoxy putty and some cloth reinforcement on the inside. RMView attachment 67228


RM~

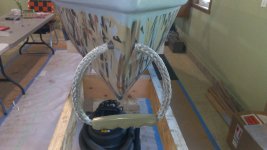
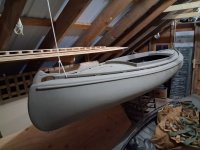
Just a couple of days ago I happened across a similar "loop hand grab" I had made many years ago. It is on the stern of my Sweet Gherkin ( https://stevenjaysanford.com/sweet-gherkin/ ) - which hangs in my loft. (I may bring it to Tuckerton and plan to hunt it locally later this year.) So, you sent me out and up to snap a couple of quick photos.
Sweet Gherkin hanging in loft FULL.jpg

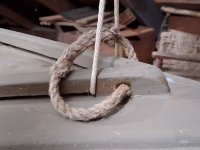
I short-spliced some 3-strand manila for the hand grab. The lighter braided nylon is suspending the vessel itself.

Sweet Gherkin - spliced stern loop.jpg
I like the way you lined the hole through your stem with PVC - good thinking!
All the best,
SJS
 
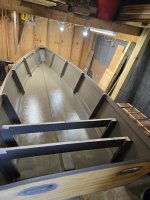
Coming down the home stretch. Interior sanded as much as I could stomach, first coat of paint applied by roller where possible. The paint is Interlux Dead Grass Green marine enamel. I give it a A- for coverage, pretty good but not the best ever. Possibly includes operator error. Boats always appear smaller to me when painted dark, this one shrunk considerably. A second coat goes on today, then time to flip for final sanding and painting the sides and bottom.

The bottom is going to be Wetlander olive drab. I'll be curious to see if Wetlander makes it easier to pole through grass, we sometimes hunt marshes with a hard bottom so the grass is bunched under the hull. Any help will be appreciated. I think I'll have some left over which will be applied to pond boxes. Looking forward to help pulling those as well.

If you look close, there is a hole for the bow eye. I drilled a pilot with a 1/4" x 24" electricians drill, then followed from both sides with a 1/2". The eye will be slightly out of square with the trim, I hit some fasteners in the bow frame that necessitated a little wiggle around. This results in the nut making contact on the bottom of the washer. There isn't enough shank to permit a shim to square it up, but I'm ok with it as it's intended for light duty use.
20250729_191306.jpg
 
The Wetlander will most certainly help pushing through grass; you will love it. Best advice for applying is don't starve the roller. RM
The video I watched backed that up for sure. I bought the 75-100 SF kit, the boat bottom is less than 40 SF There should be plenty provided I don't catalyze too much and waste it. As I mentioned, the pond boxes could use some love too.
 
Oh, and if it works as well as I hope I'd love to coat the bottom of the ProDrive. The problem is I'll need to bring it to the marina and have is hoisted off the trailer, then roll the paint on from beneath.
 
SJ

That looks fantastic. You've done it in a short period of time too. No fooling around on your part.
Thank you. I went to ME for several days last weekend, I felt like a slacker. ;) With luck the painting will wind down from here on out, so I can focus on other projects. I'm putting off the shooting stool build while I ponder the details.
 
Back
Top