You are using an out of date browser. It may not display this or other websites correctly.
You should upgrade or use an alternative browser.
You should upgrade or use an alternative browser.
September workbench
- Thread starter Don Mintz
- Start date
Mark Belknap
Member
Those are beautiful Don
First class!
Mark Belknap
Member
Mark Belknap
Member
Thanks Carl
Kevin Puls
Well-known member
Some of you knew Jon Yenulonis. He was my best and greatest duck partner. When he passed away I put up my tools and paints and only hunted 1-2 times a year. I got rid of my boat and many of my decoys.
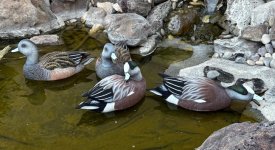
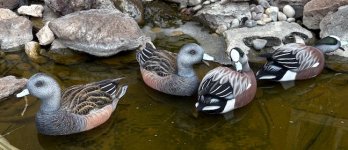
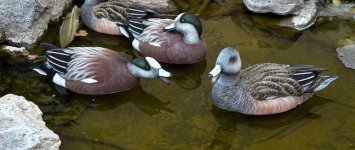
This year I have been reinvigorated. There are several reasons but I won’t bore ever with the details. This month I have worked on some E Allen decoys that Jon’s widow gave me. I have an even dozen that I finally finished painting. I prepped them carefully with solvents and sandpaper. I used gesso and texturing paste as the base. Then I painted them using Steven J Sanfords methods and paint codes, with a little variation of my own. Now I have to make keels and coat them with a protective coating.
It’s good to be back.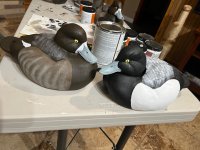

That's a familiar story. I lost my dad and my chessie 7 years ago and it just took the wind out of my sails. I haven't duck hunted in 5 years now, but plan to hunt this year with my son's lab we got last fall and a bunch of new decoys we've made over the past year.
The paint looks great on that pair
The paint looks great on that pair
Mark Belknap
Member
They look great. Nice job. I hope you enjoy this season. Every season, every day is a gift.
You never know what will be coming across my bench. In the past couple of weeks we have had some real challenges. This group of molded foam decoys we received had been, and this is a guess, coated with marine epoxy that had sawdust mixed in and spread over the foam. A great idea to add strength, but virtually unflockable and unpaintable. When rehabbing decoys it's often a lot of problem solving. I spent several hours with an orbital sander and sanding cones on my foredom to get these headless feeders smooth enough to flock while leaving the epoxy shell. There was quite a few holes to fill and smooth, but I'm pretty happy with the result in the flocking job, now it's just get them to Caleb and see what magic he can do in the paint booth.


Next in line is rehabbing this crew of plastics for a friend. There is some evidence of a home flocking kit, likely done with a water based flocking glue and for the most part it peels off in sheets. The factory flocking on most of them is really not fibers, but some sort of a powder like substance, which I'm seeing more and more, it wears off pretty easily just with routine handling. I have no idea why they flock them green and airbrush the black. It defeats the purpose of flocking them at all. The most important color for duck hunting is black and there is nothing blacker than black flocking.

The first photo here shows what a painted black looks like, the second photo is of the same decoy flocked black. It is a hollow wood bufflehead that has been hunted regularly for over 10 years. The first photo was on his initial tour as a traveling decoy with the Christian Waterfowl Association. Once I started getting photos back from various parts of the country I was unsatisfied and I flocked it, partially because flocking is more durable than just paint, but there is nothing that matches the black of a real duck better.


Next in line is rehabbing this crew of plastics for a friend. There is some evidence of a home flocking kit, likely done with a water based flocking glue and for the most part it peels off in sheets. The factory flocking on most of them is really not fibers, but some sort of a powder like substance, which I'm seeing more and more, it wears off pretty easily just with routine handling. I have no idea why they flock them green and airbrush the black. It defeats the purpose of flocking them at all. The most important color for duck hunting is black and there is nothing blacker than black flocking.

The first photo here shows what a painted black looks like, the second photo is of the same decoy flocked black. It is a hollow wood bufflehead that has been hunted regularly for over 10 years. The first photo was on his initial tour as a traveling decoy with the Christian Waterfowl Association. Once I started getting photos back from various parts of the country I was unsatisfied and I flocked it, partially because flocking is more durable than just paint, but there is nothing that matches the black of a real duck better.


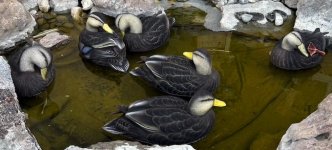
As always, super decoys. I have a question regarding black...not really black, but black duck body color. We have always painted black ducks with Japan oil raw umber. It looks really good, but I'd like to try flocking some. Your black duck bodies looked great in other posts, is there a brown color flock you use, or do you overspray the flock? It's ok if you'd rather not tell.You never know what will be coming across my bench. In the past couple of weeks we have had some real challenges. This group of molded foam decoys we received had been, and this is a guess, coated with marine epoxy that had sawdust mixed in and spread over the foam. A great idea to add strength, but virtually unflockable and unpaintable. When rehabbing decoys it's often a lot of problem solving. I spent several hours with an orbital sander and sanding cones on my foredom to get these headless feeders smooth enough to flock while leaving the epoxy shell. There was quite a few holes to fill and smooth, but I'm pretty happy with the result in the flocking job, now it's just get them to Caleb and see what magic he can do in the paint booth.
View attachment 68936View attachment 68937View attachment 68938
Next in line is rehabbing this crew of plastics for a friend. There is some evidence of a home flocking kit, likely done with a water based flocking glue and for the most part it peels off in sheets. The factory flocking on most of them is really not fibers, but some sort of a powder like substance, which I'm seeing more and more, it wears off pretty easily just with routine handling. I have no idea why they flock them green and airbrush the black. It defeats the purpose of flocking them at all. The most important color for duck hunting is black and there is nothing blacker than black flocking.
View attachment 68939
The first photo here shows what a painted black looks like, the second photo is of the same decoy flocked black. It is a hollow wood bufflehead that has been hunted regularly for over 10 years. The first photo was on his initial tour as a traveling decoy with the Christian Waterfowl Association. Once I started getting photos back from various parts of the country I was unsatisfied and I flocked it, partially because flocking is more durable than just paint, but there is nothing that matches the black of a real duck better.
View attachment 68940View attachment 68941
Carl, there's a lot of theory going on with flocking and why it's so effective and why it's blacker. My best guess would be the depth of the fibers in part and how they absorb light. I don't really like to airbrush the heads of mallards, goldeneye, buffleheads, etc. because I feel like it prevents that blackness unnecessarily. However for the other decoys I make as a matter of expectation I'll put some green airbrush on them, purple and blue on bufflehead. I definitely like the pretty and do that sort of thing routinely for others, but I'm making decoys to hunt, so I'm watching what is more effective. Flat black like what is on the bufflehead in the picture with the shotgun reflects light, it kind of makes it have a washed out look. The last picture shows that it can be just as black as the real thing and doesn't reflect light.
SJ, you end up doing various recipes for the paint colors, ( oil based enamels) What colors will make the base as close to accurate as you can. Black ducks are fairly easy to flock, If Caleb is going do his airbrush magic on it I'll flock them feather brown over gloss leather brown rustoleum. That allows Caleb to use the airbrush to do a little artistic feathering, then create a little depth with black amongst the feather groups. That's way, way unnecessary, but gives it a little life and that's always fun. However strictly from a hunting standpoint I would flock black ducks with dark brown flocking or feather brown flocking over gloss black rustoleum. Flock the head with a custom mix of gloss almond rustroleum with a little brown mixed in and use bisque tan flocking. Then I flock the cap of the head with the dark brown. I wouldn't paint a thing other than the bills. I even use black ducks out here in the snake river plain of Idaho instead of mallard hens because they just show up better.
I don't want to have to push a color too far with the airbrush. Getting color sections as close as I can in the flocking process helps. For instance when I flock the flank of a wood duck I make a color very close to that yellowish color I add a bit of brown and white to get it close the flank color and then flock it white, it will leave you with a color close.
Now some are probably a little curious about my always suggesting gloss oil based enamels like rustoleum. It seems kind of counterintuitive, but when we first started flocking there wasn't much information and nearly everything was bad information and on youtube nearly all of it is bad. Gloss helps in a few ways, one, it stays wet longer and helps you to get better coverage. two, when they add flateners to paint it weakens the paint. Gloss maters not at all with a flocked decoy, even the paint we use over flocking is gloss oil based enamel. Painting over flocking the surface still remains flat other than on the bill. There are airbrush techniques that allow you to achieve a satin finish on the bills even with gloss paint. However a glossy bill goes in the river and the gloss is usually not an issue anyway. You can't use gloss paint when painting standard plastic decoys, so you are going to have to put up with dull drab decoys like those plastics in my last post.
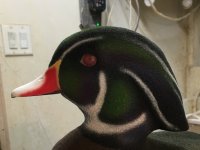
For the most part my flocking process has been discussed extensively on other forums, so it's really not a secret. Pretty simply is flocking dusted over a decoy painted with gloss oil based enamel with a kitchen sieve, shake it on before you shake it off and that's your first coat. Let that dry overnight and then flock specific colors for a second coats. For instance on a mallard drake, I flock it grey first, the whole body except the head. Then I flock that part of the body that should remain grey, from the front of the flank to the end of the femoral tract and all the back to the base of the back of the neck and to the ends of the tertials. After another day of drying I'll flock the chest and head feather brown over gloss leather brown. Then the next day I can finish the flocking by flocking the head black and the entire rump and tail black. We hand paint the white tail with flat white rustoleum as well as the neck ring. White is a different animal and it's just not white enough with the airbrush over flocking and needs painted over, this series of pictures of a wood duck demonstrates that fact.


Great write up, thank you! As soon as the current boat build is done, it's on to flocking!Carl, there's a lot of theory going on with flocking and why it's so effective and why it's blacker. My best guess would be the depth of the fibers in part and how they absorb light. I don't really like to airbrush the heads of mallards, goldeneye, buffleheads, etc. because I feel like it prevents that blackness unnecessarily. However for the other decoys I make as a matter of expectation I'll put some green airbrush on them, purple and blue on bufflehead. I definitely like the pretty and do that sort of thing routinely for others, but I'm making decoys to hunt, so I'm watching what is more effective. Flat black like what is on the bufflehead in the picture with the shotgun reflects light, it kind of makes it have a washed out look. The last picture shows that it can be just as black as the real thing and doesn't reflect light.
SJ, you end up doing various recipes for the paint colors, ( oil based enamels) What colors will make the base as close to accurate as you can. Black ducks are fairly easy to flock, If Caleb is going do his airbrush magic on it I'll flock them feather brown over gloss leather brown rustoleum. That allows Caleb to use the airbrush to do a little artistic feathering, then create a little depth with black amongst the feather groups. That's way, way unnecessary, but gives it a little life and that's always fun. However strictly from a hunting standpoint I would flock black ducks with dark brown flocking or feather brown flocking over gloss black rustoleum. Flock the head with a custom mix of gloss almond rustroleum with a little brown mixed in and use bisque tan flocking. Then I flock the cap of the head with the dark brown. I wouldn't paint a thing other than the bills. I even use black ducks out here in the snake river plain of Idaho instead of mallard hens because they just show up better.
I don't want to have to push a color too far with the airbrush. Getting color sections as close as I can in the flocking process helps. For instance when I flock the flank of a wood duck I make a color very close to that yellowish color I add a bit of brown and white to get it close the flank color and then flock it white, it will leave you with a color close.
Now some are probably a little curious about my always suggesting gloss oil based enamels like rustoleum. It seems kind of counterintuitive, but when we first started flocking there wasn't much information and nearly everything was bad information and on youtube nearly all of it is bad. Gloss helps in a few ways, one, it stays wet longer and helps you to get better coverage. two, when they add flateners to paint it weakens the paint. Gloss maters not at all with a flocked decoy, even the paint we use over flocking is gloss oil based enamel. Painting over flocking the surface still remains flat other than on the bill. There are airbrush techniques that allow you to achieve a satin finish on the bills even with gloss paint. However a glossy bill goes in the river and the gloss is usually not an issue anyway. You can't use gloss paint when painting standard plastic decoys, so you are going to have to put up with dull drab decoys like those plastics in my last post.
For the most part my flocking process has been discussed extensively on other forums, so it's really not a secret. Pretty simply is flocking dusted over a decoy painted with gloss oil based enamel with a kitchen sieve, shake it on before you shake it off and that's your first coat. Let that dry overnight and then flock specific colors for a second coats. For instance on a mallard drake, I flock it grey first, the whole body except the head. Then I flock that part of the body that should remain grey, from the front of the flank to the end of the femoral tract and all the back to the base of the back of the neck and to the ends of the tertials. After another day of drying I'll flock the chest and head feather brown over gloss leather brown. Then the next day I can finish the flocking by flocking the head black and the entire rump and tail black. We hand paint the white tail with flat white rustoleum as well as the neck ring. White is a different animal and it's just not white enough with the airbrush over flocking and needs painted over, this series of pictures of a wood duck demonstrates that fact.
View attachment 68953View attachment 68954View attachment 68955
@SJ Fairbank here is what my mallards look like before I start airbrushing. I’m going to switch up the hens a little bit next time I do some, lighten the head color and leave the rest the brown color. You can see I do gray body and black heads and rump for drakes.
My hens are 95% done, and I’ll get pics once finished and then you can see how they transform. My painting abilities are nowhere near dons abilities. But the idea is the same and I can promise you, they hunt just fine.
Im still very much learning the 3 color rule to make the 3D effect come to life.
My hens are 95% done, and I’ll get pics once finished and then you can see how they transform. My painting abilities are nowhere near dons abilities. But the idea is the same and I can promise you, they hunt just fine.
Im still very much learning the 3 color rule to make the 3D effect come to life.
Attachments
Those are mighty fine without airbrushing. Any self respecting mallard would be proud to be fooled by them.@SJ Fairbank here is what my mallards look like before I start airbrushing. I’m going to switch up the hens a little bit next time I do some, lighten the head color and leave the rest the brown color. You can see I do gray body and black heads and rump for drakes.
My hens are 95% done, and I’ll get pics once finished and then you can see how they transform. My painting abilities are nowhere near dons abilities. But the idea is the same and I can promise you, they hunt just fine.
Im still very much learning the 3 color rule to make the 3D effect come to life.

