
You are using an out of date browser. It may not display this or other websites correctly.
You should upgrade or use an alternative browser.
You should upgrade or use an alternative browser.
TDB-17' Classic refurbish project redux
- Thread starter RLLigman
- Start date

Steve Sanford
Well-known member
Good morning, RL~
Excellent work - as anticipated!
Question: Were you replacing the foam flotation up forward - or adding new?
All the best,
SJS
Excellent work - as anticipated!
Question: Were you replacing the foam flotation up forward - or adding new?
All the best,
SJS
Jon Yenulonis
Well-known member
Very nice job, photos and description. Thanks for taking the time with it all!
I have been in, and hunted out of about every type of specialized Duck Hunting boat, and of all, the TDB 17 is my favorite. Maybe someday...
Looks good!
Jon
I have been in, and hunted out of about every type of specialized Duck Hunting boat, and of all, the TDB 17 is my favorite. Maybe someday...
Looks good!
Jon
Kevin Puls
Well-known member
Looks good!
Thank you all!
Jon, I let Tom Kondrk convince me that a 15hp was more than adequate to plane a TDB-14' with two guys and a dog. I already had a two year old 15hp at the time...so I bit!. Finally, I just reached a point where I wanted more range and more decoy carrying capacity.
Kane just lost his testicles this morning. There is a freezing drizzle falling outside. I have NPR on for "white noise" for the dog. It's time to just get this completed... I changed the font size to make it a little easier to read this.
After cutting the four plugs out of the foredeck, I elevated the bow as far as I could to facilitate the flotation foam pours. I cut-out several squares of aluminum foil and pierced them to backfold into the pour and vent holes to "catch" any errant foam. I took the four fiberglass deck plugs and sanded the paint layers off using my belt sander. I then cut eight 3/4oz. CSM squares. I overlapped two squares and saturated each of these four work pieces with epoxy resin. Once they had set-up and cured completely, I epoxied them to the four deck plug pieces. After the flotation foam pours were complete, I epoxied these back in place(I had labeled each as I cut them) in their respective holes, using the CSM overlap areas to adhere them to the sanded and scored foredeck again. I used stainless bolts and locking washers to reinstall the hatch cover. Just for piece of mind, I coated the bolt threads with Threadlock.

[URL=http://s1285.photobucket.com/user/RLLigman/media/DSC01569_zpsvclkpbig.jpg.html]
I replaced the old nylon cleats with some aluminum versions I scrounged from the folks at Bingham’s Boat Works and added Starboard material backing plates to them, followed by a Threadloc treatment and thread caps, which were also installed on all of the exposed grassing rail bolts in the foredeck area. I also added the same 1/4" nylon material backing plates to the rear blind support stanchions to strengthen these a bit to allow my to put most of my body weight on the rear blind corner supports as I climb back into the boat across the splash well. I dabbed all of the deck turn button stainless screw posts with Goop prior painting the underside of the deck.
[URL=http://s1285.photobucket.com/user/RLLigman/media/DSC01459_zps71p2uxi8.jpg.html]
[URL=http://s1285.photobucket.com/user/RLLigman/media/DSC01464_zpsi0ibubbl.jpg.html]
A friend had the four blind support rods anodized black at a facility he manages. I color coded them with some electrical tape to provide an easy sort interval during blind set-up. Sea Dog makes a rubberized retention clip for 1" OD rods, I bought some from Duckworks Boat Building Supplies to mount on the interior shelves after I finish them this summer. I covered the blind support rods with some inverted road bike inner tubes for abrasion protection and cushioning-an old mountain biker’s bar-end grip trick. I knew I would get something out of that interval of my life beyond broken bones and scar tissue!
[URL=http://s1285.photobucket.com/user/RLLigman/media/DSC01458_zps4ebirgtv.jpg.html]
[URL=http://s1285.photobucket.com/user/RLLigman/media/DSC01463_zpsnwkuz4go.jpg.html]
I removed all the blind poles and fittings and had them powder coated by a friend of a friend who owns a local plastic extrusion company (thanks Bob).
[URL=http://s1285.photobucket.com/user/RLLigman/media/DSC01467_zpschphb3cr.jpg.html]
As the pictures illustrate, all of the support poles were fitted with hardwood dowel rods. The port and starboard support pole inserts were further strengthened by cutting them into 2’ sections prior threading ¼” fiberglass dowel rods coated with epoxy through holes I drilled through the long axis of each section, “stitching” them back together into a one piece length. I was impressed by how much pressure I could put on them without them sagging, once everything was assembled and installed.
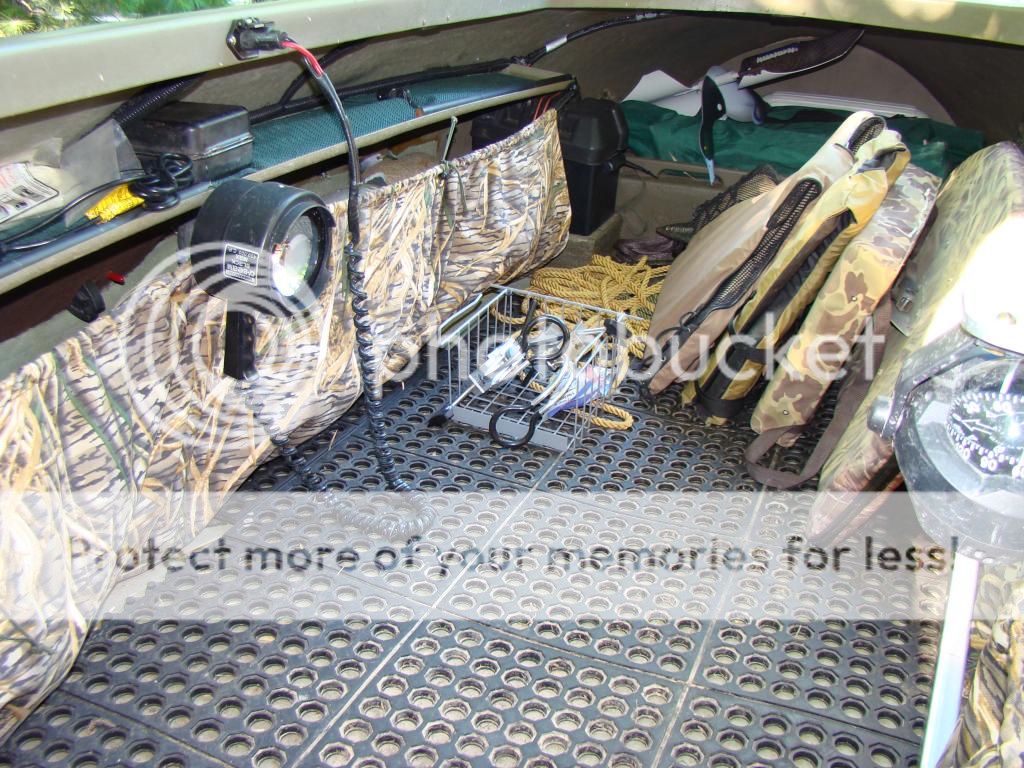
Now, it was time to address the wiring layout. I installed two new circuits to the main panel, one for five red LED deck lights for use during decoy deployment and retrieval in darkness, and a second circuit for an 800gph bilge pump installation. I cleaned-up some of the buss bar wiring, as well as adding wire loom on several sections that were exposed to potential damage. I also repaired the interior cabin lights. All wiring was done with marine grade Ancor brand tinned wire. I have the name of the company that manufactures these switch panel labels, if you want to add or replace any of them on your TDB. I will likely add another circuit for a power supply for my Garmin, once I install it.
I also purchased an internal threaded knurled rubber screw-on panel retention knob to replace the jury-rigged wingnut the Clark's used. I have the source information if anyone is interested in doing the same.
[URL=http://s1285.photobucket.com/user/RLLigman/media/DSC01535_zpsiewamssh.jpg.html]
I mounted the bilge pump slightly off-center to allow me to still run a hose down the length of the below-deck PVC drain tube to flush this out periodically. I mounted the exhaust port thru-hull fitting to empty into the motor splash well in the forward starboard quarter in hope that it would wash away the mud I track in when coming and going from the boat. I opted to not drill a mount hole for the base screen unit on the bilge pump housing, simply scoring the bilge sump's surface and anchoring the unit with black RTV. Thus far it has remained in place.
[URL=http://s1285.photobucket.com/user/RLLigman/media/DSC01466_zpsbhznz1fg.jpg.html]
[URL=http://s1285.photobucket.com/user/RLLigman/media/DSC01534_zpsbrm9rjjc.jpg.html]
Prior mounting the bilge pump I emptied the stern bilge sump area, sanded it down and painted it with two coats of Parkers Marsh Grass brown paint. I recaulked the battery box tie down deck screws, as well as installing a diamond tread section under the battery box to minimize abrasion, as well as cusion the Group 27 battery. I also installed a ¾” thick piece of Starboard with a brass center drain tube mounted in a double thickness block, to the opening of the bilge sump. This will hopefully serve as a debris dam to minimize flow of general waterfowling “gunk” that accumulates on the work deck of a duckboat during use, as well as preserving the longevity of the bilge pump impellar.
[URL=http://s1285.photobucket.com/user/RLLigman/media/DSC01462_zpsffepkf2s.jpg.html]
[URL=http://s1285.photobucket.com/user/RLLigman/media/DSC01448_zpshlicxf0w.jpg.html]
After I had completed the wiring installation of four 4” LED banks and tested them in darkness, I decided that having a fifth bank in the bow section of the cockpit would be a nice addition. I finally settled on a 6” waterproof array, mounted on the inside face of the bow combing. It quickly became apparent that this light bank would eventually get damaged during either anchor deployment or during setting and pulling my decoys. I ripped a section of scrap hardwood dowel to mount as a "fender" below the light bank, initially with 5200, but I then decided to tap it with two stainless wood screws mounted through the back side of the bow combing edge.
You can see my test coat area of Parker's Marsh Grass-nearly a perfect match to the TDB's original gelcoat color.
[URL=http://s1285.photobucket.com/user/RLLigman/media/DSC01533_zpsko92n9ea.jpg.html]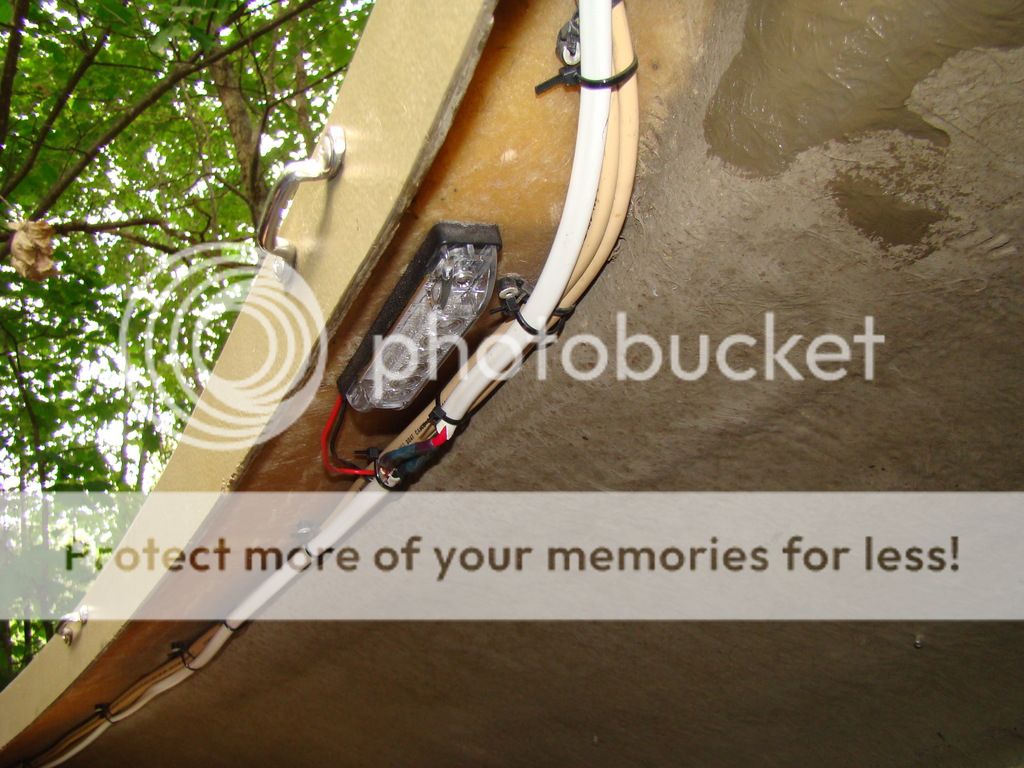
[URL=http://s1285.photobucket.com/user/RLLigman/media/DSC01457_zpsgumnb44p.jpg.html]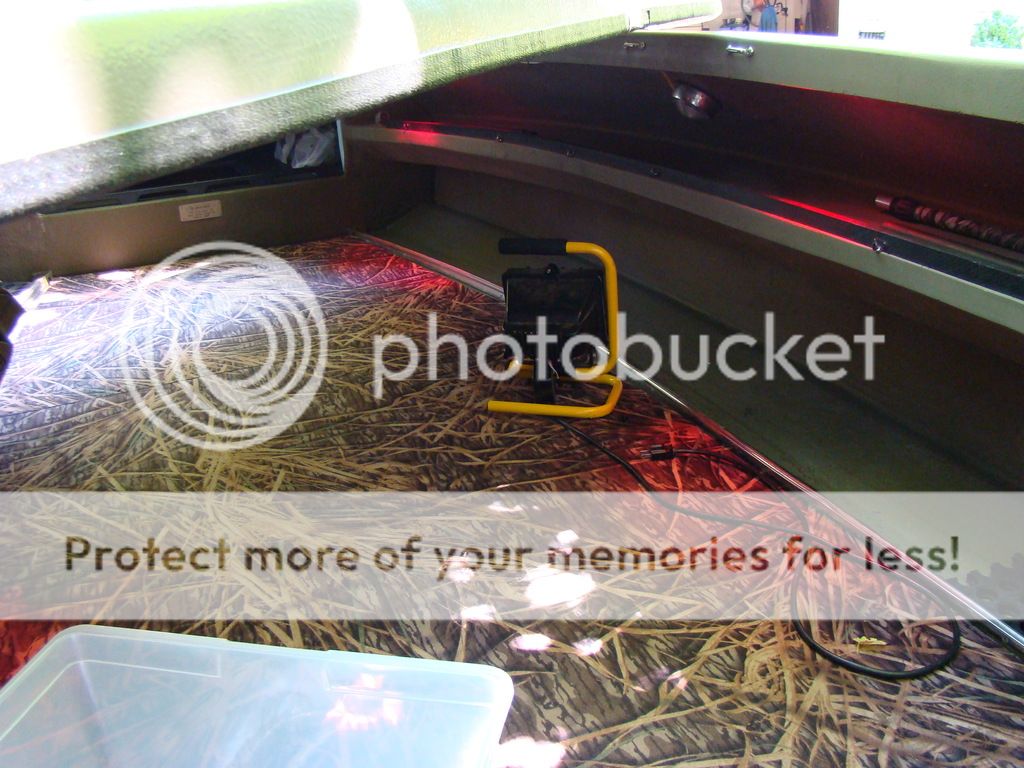
[URL=http://s1285.photobucket.com/user/RLLigman/media/DSC01567_zpskpwos7ht.jpg.html]
It worked out well to simply zip tie this to the existing wire runs for the cabin lights.
I pried the hog rings off the shock cord sections on the decoy compartment curtains and replaced them after I added new Marine ¼” shock cord. Nearly all of the interior foam protective edging on the decoy curtain track interior edges was intact. I repaired a couple of chips and one small six inch long section prior, beginning the process of stripping and sanding the decoy compartments back to bare exposed fiberglass. Several days later, I was ready to install the 9” wide Kevlar layer down the interior chine of the hull and overlay this with two overlapping layers of biaxial cloth (1708) with a CSM backing. I opted to use epoxy resin rather than polyester resin, for its strength and waterproof merits.
[URL=http://s1285.photobucket.com/user/RLLigman/media/DSC01486_zpsnziwgwrd.jpg.html]
[URL=http://s1285.photobucket.com/user/RLLigman/media/DSC01485_zpshzt6lypl.jpg.html]
[URL=http://s1285.photobucket.com/user/RLLigman/media/DSC01529_zpsncy6yt3k.jpg.html]
There is a channel in the exterior hull’s face that creates the illusion that the Kevlar layer is wider on the interior hull face above the chine; its centered on the chine.
Once these had cured I sanded the interior sections of the decoy compartments to prepare them for three coats of Tan Tuff-Coat. I was originally going to have Rhino Liner spray applied, but I could never get in-sync with the shop owner’s schedule prior the start of duck season.
[URL=http://s1285.photobucket.com/user/RLLigman/media/DSC01567_zpskpwos7ht.jpg.html]
Jon, I let Tom Kondrk convince me that a 15hp was more than adequate to plane a TDB-14' with two guys and a dog. I already had a two year old 15hp at the time...so I bit!. Finally, I just reached a point where I wanted more range and more decoy carrying capacity.
Kane just lost his testicles this morning. There is a freezing drizzle falling outside. I have NPR on for "white noise" for the dog. It's time to just get this completed... I changed the font size to make it a little easier to read this.
After cutting the four plugs out of the foredeck, I elevated the bow as far as I could to facilitate the flotation foam pours. I cut-out several squares of aluminum foil and pierced them to backfold into the pour and vent holes to "catch" any errant foam. I took the four fiberglass deck plugs and sanded the paint layers off using my belt sander. I then cut eight 3/4oz. CSM squares. I overlapped two squares and saturated each of these four work pieces with epoxy resin. Once they had set-up and cured completely, I epoxied them to the four deck plug pieces. After the flotation foam pours were complete, I epoxied these back in place(I had labeled each as I cut them) in their respective holes, using the CSM overlap areas to adhere them to the sanded and scored foredeck again. I used stainless bolts and locking washers to reinstall the hatch cover. Just for piece of mind, I coated the bolt threads with Threadlock.

[URL=http://s1285.photobucket.com/user/RLLigman/media/DSC01569_zpsvclkpbig.jpg.html]
I replaced the old nylon cleats with some aluminum versions I scrounged from the folks at Bingham’s Boat Works and added Starboard material backing plates to them, followed by a Threadloc treatment and thread caps, which were also installed on all of the exposed grassing rail bolts in the foredeck area. I also added the same 1/4" nylon material backing plates to the rear blind support stanchions to strengthen these a bit to allow my to put most of my body weight on the rear blind corner supports as I climb back into the boat across the splash well. I dabbed all of the deck turn button stainless screw posts with Goop prior painting the underside of the deck.
[URL=http://s1285.photobucket.com/user/RLLigman/media/DSC01459_zps71p2uxi8.jpg.html]
[URL=http://s1285.photobucket.com/user/RLLigman/media/DSC01464_zpsi0ibubbl.jpg.html]
A friend had the four blind support rods anodized black at a facility he manages. I color coded them with some electrical tape to provide an easy sort interval during blind set-up. Sea Dog makes a rubberized retention clip for 1" OD rods, I bought some from Duckworks Boat Building Supplies to mount on the interior shelves after I finish them this summer. I covered the blind support rods with some inverted road bike inner tubes for abrasion protection and cushioning-an old mountain biker’s bar-end grip trick. I knew I would get something out of that interval of my life beyond broken bones and scar tissue!
[URL=http://s1285.photobucket.com/user/RLLigman/media/DSC01458_zps4ebirgtv.jpg.html]
[URL=http://s1285.photobucket.com/user/RLLigman/media/DSC01463_zpsnwkuz4go.jpg.html]
I removed all the blind poles and fittings and had them powder coated by a friend of a friend who owns a local plastic extrusion company (thanks Bob).
[URL=http://s1285.photobucket.com/user/RLLigman/media/DSC01467_zpschphb3cr.jpg.html]
As the pictures illustrate, all of the support poles were fitted with hardwood dowel rods. The port and starboard support pole inserts were further strengthened by cutting them into 2’ sections prior threading ¼” fiberglass dowel rods coated with epoxy through holes I drilled through the long axis of each section, “stitching” them back together into a one piece length. I was impressed by how much pressure I could put on them without them sagging, once everything was assembled and installed.
Now, it was time to address the wiring layout. I installed two new circuits to the main panel, one for five red LED deck lights for use during decoy deployment and retrieval in darkness, and a second circuit for an 800gph bilge pump installation. I cleaned-up some of the buss bar wiring, as well as adding wire loom on several sections that were exposed to potential damage. I also repaired the interior cabin lights. All wiring was done with marine grade Ancor brand tinned wire. I have the name of the company that manufactures these switch panel labels, if you want to add or replace any of them on your TDB. I will likely add another circuit for a power supply for my Garmin, once I install it.
I also purchased an internal threaded knurled rubber screw-on panel retention knob to replace the jury-rigged wingnut the Clark's used. I have the source information if anyone is interested in doing the same.
[URL=http://s1285.photobucket.com/user/RLLigman/media/DSC01535_zpsiewamssh.jpg.html]
I mounted the bilge pump slightly off-center to allow me to still run a hose down the length of the below-deck PVC drain tube to flush this out periodically. I mounted the exhaust port thru-hull fitting to empty into the motor splash well in the forward starboard quarter in hope that it would wash away the mud I track in when coming and going from the boat. I opted to not drill a mount hole for the base screen unit on the bilge pump housing, simply scoring the bilge sump's surface and anchoring the unit with black RTV. Thus far it has remained in place.
[URL=http://s1285.photobucket.com/user/RLLigman/media/DSC01466_zpsbhznz1fg.jpg.html]
[URL=http://s1285.photobucket.com/user/RLLigman/media/DSC01534_zpsbrm9rjjc.jpg.html]
Prior mounting the bilge pump I emptied the stern bilge sump area, sanded it down and painted it with two coats of Parkers Marsh Grass brown paint. I recaulked the battery box tie down deck screws, as well as installing a diamond tread section under the battery box to minimize abrasion, as well as cusion the Group 27 battery. I also installed a ¾” thick piece of Starboard with a brass center drain tube mounted in a double thickness block, to the opening of the bilge sump. This will hopefully serve as a debris dam to minimize flow of general waterfowling “gunk” that accumulates on the work deck of a duckboat during use, as well as preserving the longevity of the bilge pump impellar.
[URL=http://s1285.photobucket.com/user/RLLigman/media/DSC01462_zpsffepkf2s.jpg.html]
[URL=http://s1285.photobucket.com/user/RLLigman/media/DSC01448_zpshlicxf0w.jpg.html]
After I had completed the wiring installation of four 4” LED banks and tested them in darkness, I decided that having a fifth bank in the bow section of the cockpit would be a nice addition. I finally settled on a 6” waterproof array, mounted on the inside face of the bow combing. It quickly became apparent that this light bank would eventually get damaged during either anchor deployment or during setting and pulling my decoys. I ripped a section of scrap hardwood dowel to mount as a "fender" below the light bank, initially with 5200, but I then decided to tap it with two stainless wood screws mounted through the back side of the bow combing edge.
You can see my test coat area of Parker's Marsh Grass-nearly a perfect match to the TDB's original gelcoat color.
[URL=http://s1285.photobucket.com/user/RLLigman/media/DSC01533_zpsko92n9ea.jpg.html]
[URL=http://s1285.photobucket.com/user/RLLigman/media/DSC01457_zpsgumnb44p.jpg.html]
[URL=http://s1285.photobucket.com/user/RLLigman/media/DSC01567_zpskpwos7ht.jpg.html]
It worked out well to simply zip tie this to the existing wire runs for the cabin lights.
I pried the hog rings off the shock cord sections on the decoy compartment curtains and replaced them after I added new Marine ¼” shock cord. Nearly all of the interior foam protective edging on the decoy curtain track interior edges was intact. I repaired a couple of chips and one small six inch long section prior, beginning the process of stripping and sanding the decoy compartments back to bare exposed fiberglass. Several days later, I was ready to install the 9” wide Kevlar layer down the interior chine of the hull and overlay this with two overlapping layers of biaxial cloth (1708) with a CSM backing. I opted to use epoxy resin rather than polyester resin, for its strength and waterproof merits.
[URL=http://s1285.photobucket.com/user/RLLigman/media/DSC01486_zpsnziwgwrd.jpg.html]
[URL=http://s1285.photobucket.com/user/RLLigman/media/DSC01485_zpshzt6lypl.jpg.html]
[URL=http://s1285.photobucket.com/user/RLLigman/media/DSC01529_zpsncy6yt3k.jpg.html]
There is a channel in the exterior hull’s face that creates the illusion that the Kevlar layer is wider on the interior hull face above the chine; its centered on the chine.
Once these had cured I sanded the interior sections of the decoy compartments to prepare them for three coats of Tan Tuff-Coat. I was originally going to have Rhino Liner spray applied, but I could never get in-sync with the shop owner’s schedule prior the start of duck season.
[URL=http://s1285.photobucket.com/user/RLLigman/media/DSC01567_zpskpwos7ht.jpg.html]
Last edited:
Phil Nowack
Well-known member
Nice!
Thanks, Phil!
The final two legs of the refurbish work on this boat involved the hard cover and the work deck. The previous owner had the hard cover blow out of his hands while out hunting with the boat in NoDak. The result was a crack in the cover edge and some stress cracks that all likely occurred when the cover returned to Earth. Having personally witnessed three of my handmade sandhill crane silhouettes perform some airborne “maneuvers” on windy hunts out there, I can fully appreciate his experience. My first repair attempt failed. I focused my second repair on addressing the structural issues in the fiberglass top section radiating away from the crack toward the bow eye. After two sanding/acetone wash, sanding/acetone wash cycles, I added three alternating 3/4oz. CSM/cloth/CSM layers that overlaid the adjacent PVC “rib” support, eliminating the “hinge effect” that occurred when I would lift the cover off at the bow end of the cockpit. I flipped the cover upside down and weighted it down on my work table with Gold’s Gym dumbbells to flatten the sagging section I intended to reinforce. The old-style covers TDB-17’ were supported by a series of PVC ribs, ripped lengthwise, and then fiberglassed onto the underside of the cover with CSM overlay layers. Had the Clark’s not pieced the longer runs to use up scrap, I think these would hold-up better over time. I ended-up drilling some ½” diameter pour holes at the cross-brace junctions and pouring 8lb. density urethane 2-part foam into the interior hollow sections to expand, adding some additional rigidity/support at these points of stress, while minimizing added weight. I then repeated the CSM/Cloth/CSM overlay sequence on each of these. Sorry, I never took photos of this work.

After I improved the integrity of the hard cover by strengthening the stress cracks that radiated from the physical break in the cover, I applied a series of strips of fiberglass cloth, interspersed with a sequential layer of 1/2 oz. CSM. I oriented the roving weave at a rough 45 degree angle to the previous cloth layer. I “slopped” some Marine-tex waterproof epoxy repair putty I tinted to olive green on the faired-back outside section, and then sponged a couple of coats of Parkers Marsh Grass paint over it when it cure. This is a stop-gap repair to get me through until I can do this properly next summer.
I replaced the bow stop, 8” center roller and bushings, LED tail lights and two sections of the trailer wiring, as well as enclosing all exposed trailer wire runs in wire
loom. I also added a pair of spare tire hangers. Eventually, I would like to switch over to 13” radial tires; either Kenda or Goodrich.
I stripped the paint off the work deck. I then followed this with two cycles of sanding and acetone washes. I bought 3 yards of Dynel 5oz. cloth from Jamestown Distributors, after watching the folks at Bingham Boat Works do a couple of applications on hulls they are refurbishing. After cutting the Dynel cloth to fit, I swallowed hard and started to lay it with epoxy resin over the work deck. I apologize, but I had to work very quickly, so I took no pictures. Essentially, I weighted the cloth panel with a series of Gold’s dumb bells(now you know why I just happened to have them outside in my garage)along the outboard edges, to hold it tightly in place while the resin settled. I then poured US Composites 3:1 epoxy resin slowly in a broad line down the center of the work deck in roughly 3’ long intervals to allow the resin to settle, via gravity, into the cloth. Once the flowing epoxy resin’s rate of advance out from the pour line slowed significantly, I carefully and SLOWLY spread it out to the outside edge of the cloth near the decoy curtain track. I worked from stern to bow, slowly unrolling and weighting the Dynel cloth down while backing down the deck until I had to climb out and work off my step ladder for the last few feet. I am glad I picked a cool day with full cloud cover. Wow, does this cloth swell once it is exposed to the epoxy resin! After it cured, I washed the blush off and then scoured it with several passes with a Scotch Brite ultra course pad. I hunted the season with the work deck covered by the Styx River neoprene pads that came with the boat. I appreciate their ability to cushion as well as insulate, but I will likely add a layer of commercial kitchen mats cut to fit, after I paint the work deck this year.
I did initiate the process of strengthening the rear section of the motor splashwell as a main route of ingress/egress from the cockpit. I added a section of rubber diamond plate to the top of the cockpit combing, anchored with 5200, as well as laying a scrap piece of 7oz. Kevlar cloth on the underside interior face. I will lay a second Kevlar sheet over this, followed by a 3.4oz. CSM layer using polyester resin this summer, when there is ample time for it to out gas.
I will likely add some flint paper applique' strips in the splashwell for additional traction, too. With the blind frame strengthened, I can now put my weight fully on the support junctions and swing into the cockpit feet first, rather than step in. My new knee appreciates this feature, since it is only designed for a 125 degree arc of flexion. I am at 134 degrees flexion for its companion joint...
[URL=http://s1285.photobucket.com/user/RLLigman/media/DSC01465_zps6hu88jfl.jpg.html]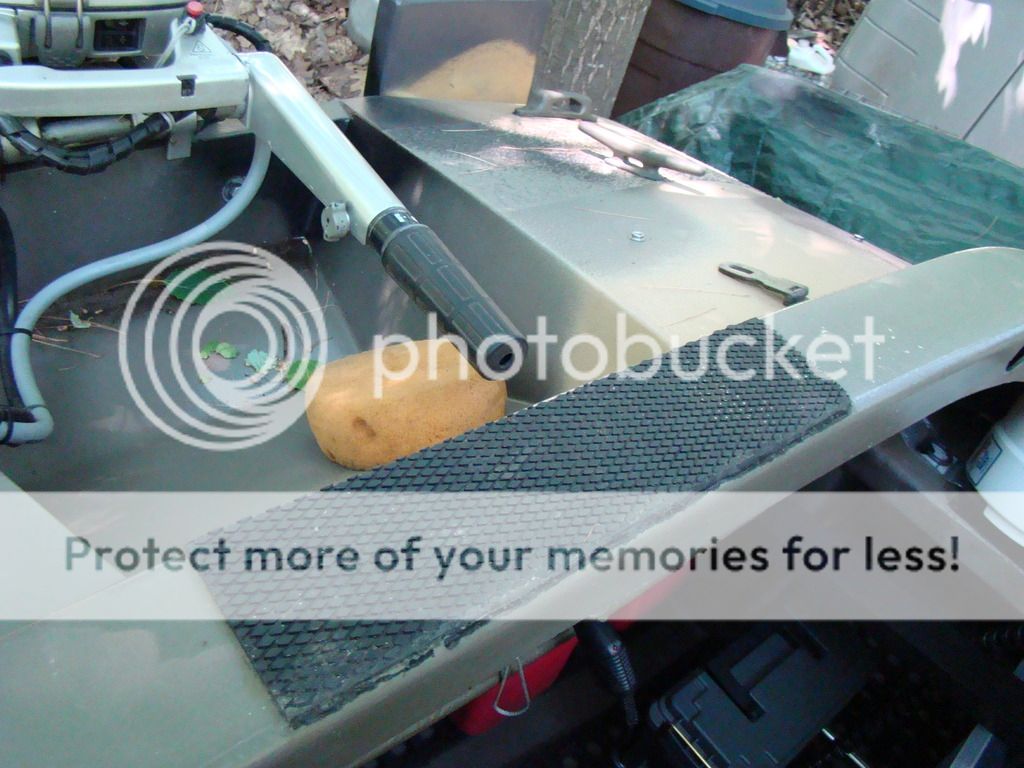
After looking at several Garelick ladder/step options, I bought a rope/PVC tube portable ladder from Duckworks that suspends from the starboard stern cleat.
I will take some photos of the finish work on the work deck, as well as the sail battens, batten pockets, and rework of the rain roof panel(I can’t find my photos and the boat is now covered with tarps and snow…), along with the internal shelving sections refurbish and internal battery charge install next summer.
Take care and stay safe!
Rick
Last edited:
I've known and hunted ducks and geese with Rick for close to 30 years.
To say he is passionate about waterfowling is obvious. He has been a big help to me when it comes to decoys and gear. Sharing the duck openers with him is a treat, which includes our evening meals, along with a bottle, or two, of good red wine.
Now I get to see his new dog Kane in action, not to mention a great duck boat to get us safely around the marsh. The 2016 opener can't come soon enough. And I realise how sharing one's passions with another who is like minded is a blessing.
Thanks Rick.
Louie
Phil Eager
Well-known member
wow Rick.. you did a lot.Looking good.
Phil
Joe Brewer
Active member
Very impressive!
Pat Gregory
Well-known member
Rick - Your attention to detail is impeccable! Excellent work! Pat
Good morning, RL~
Excellent work - as anticipated!
Question: Were you replacing the foam flotation up forward - or adding new?
All the best,
SJS
Sorry, I opted to edit my posts first.
Steve, I was adding additional flotation foam. I think I kept my calculations sheet...somewhere. The 4lb foam pours added a little over 100 and some pounds, offsetting the nearly sixty-eigt pounds of resin, Kevlar, and fiberglass I added. It also really "quiets" the hull down when running in a heavy chop. My TDB-14' was very noisy, initially, when underway. I cut some large windows out of the foredeck, installed a pair of marine plywood panels as bulkheads and poured flotation foam in the outboard sections in similar fashion. In that boat, I was also trying to offset the weight of adding a battery. The battery base stand is a 1/2" marine plywood square, with four 1" dowel rod legs cut and fit to hold it level. I coated this with West System resin and epoxied it in place prior "burying" it in fiberglass cloth and CSM layers. Once it had cured I filled the void underneath the plywood decking via a drilled access hole, as well as two vent holes, with insulation foam. I sited it to offset some of my weight at the helm station, as well as aid in getting the hull up on plane.

Steve Sanford
Well-known member
Good morning, RL~
Good thinking!
Another question: Have you though of putting actual steps on the afterdeck? I hunt out of Craig Kessler's 17 TDB and have a hard time getting in from the water or adjacent marsh. We are often in icing conditions and I want something that will really give my boots a solid purchase. I will be on LI next week - so will have my thinking cap on. A couple of steps on the starboard quarter - and a good handhold on the coaming - and I could get in much more safely.
BTW: It doesn't help that Craig is 4 or 5 inches taller than I - my bandy legs and artificial knees put me at a distinct disadvantage.
All the best,
SJS
In deference to David Letterman's top ten reasons why skits...
I prefer to hunt with Louie because:1.) He won't drink wine that is sold by the box! 2.) I like to cook dishes that feature wild game, and I need help cleaning up the post-meal mess. 3.)One of us needs to shoot consistently well, to provide wild game as table fare! 4.)He thinks good food and conversation, anti-inflammatory meds./analgesics, "likker", mountains of shot shells, the smell of wet dogs and drying waders, loaded guns, tons of ancillary gear, and nasty inclement weather are all the right "ingredients" for a fun time in the marsh! 5.) He won't steal my peanut butter on bagles at breakfast, but he will make me coffee with a French Press. 6.) He allows my wife to walk on his beach with our dog(s)... 7.)I remain hopeful to one day convince him that Mrs. Renfro's habanero salsa over scrambled eggs is haute cuisine! 8.) He has two great children that tolerate my efforts to corrupt their father's core values. 9.)He makes great smoked almonds! 10.) He remains optimistic that one morning I will cease being an Independent and wake-up a conservative!
Someday, I expect him to tell me that Little Feat and the Greatful Dead were great bands and George McGovern would have made a better President!
Now, you tell me, who is the greater optimist?
Gary Tanner
Active member
What a great thread to read on a snowy Saturday morning!
Gary
Gary
Good morning, RL~
Good thinking!
Another question: Have you though of putting actual steps on the afterdeck? I hunt out of Craig Kessler's 17 TDB and have a hard time getting in from the water or adjacent marsh. We are often in icing conditions and I want something that will really give my boots a solid purchase. I will be on LI next week - so will have my thinking cap on. A couple of steps on the starboard quarter - and a good handhold on the coaming - and I could get in much more safely.
BTW: It doesn't help that Craig is 4 or 5 inches taller than I - my bandy legs and artificial knees put me at a distinct disadvantage.
All the best,
SJS
Steve,
These are for reference:
http://www.boatersland.com/grl19700.html
http://www.ebay.com/itm/Garelick-Silver-14-1-2-x-13-3-8-Inch-Stainless-Steel-Boat-1-Step-Ladder-/401023477469?hash=item5d5edca6dd:g:780AAOSwT5tWPQPr&vxp=mtr
http://www.ebay.com/itm/Garelick-Eez-In-II-19900-50-Black-Steel-Plastic-Boat-2-Step-Compact-Ladder-/401040364953?hash=item5d5fde5599:g:Am4AAOSwv-NWavtP&vxp=mtr
http://www.ebay.com/itm/Perko-Fixed-Step-/121862710832?hash=item1c5f956630
http://www.ebay.com/itm/PERKO-CHROME-PLATED-BRONZE-FIXED-STEP-0351DP0CHR-MARINE-BOAT-/191220377031?hash=item2c859f65c7
http://www.ebay.com/itm/141495093581?_trksid=p2060353.m1438.l2649&ssPageName=STRK%3AMEBIDX%3AIT
This is what I opted to go with for now:
http://www.duckworksbbs.com/gear/ladder/bt-lad.htm
I weighted the bottom rung with some lead strap decoy anchors wrapped around the rope and taped in place. If this doesn't work, I will install the Perko folding step unit just above the waterline on the transom. I am holding-off until I get my 6hp added to the auxillary motor bracket and a full 3gallon gas can onboard.
Last edited:
Phil Nowack
Well-known member
I really don't like these threads... I really was wanting a TDB17SC... but could not find one... so I built my Scaup... which is great... but I always second guess decision....
Jeremy Tilly
Member
Very nice looks good hope to find one o I can do the same