South Bay Spa Treatment

Steve,
Tell how this spa treatment works. Does one just leave a boat for a few days and let the artist work his magic.
Do you pick from a menu, Like give me an L7 lunch special?
Are there budget , and first class plans?
Every time I read this I laugh, but I truly like the detail that most will not even see.
"Note how the aft end of the pad is streamlined - so Bill can maintain that 7 knots"
 
Steve, love your radias tool... I have bunch of them that I use. Drives my brother NUTS... [retired Grumman guy]... Beats the complicated compass...
 
Good morning, Bill~

I just now crawled out of her....installed the Beckson Deck Plates in the aft bulkhead and mounted the gas line up under the starboard deck - so it'll be out from underfoot (and paw). And, I just firmed up my designs for 2 "storage units" to help keep stuff dry and organized below decks.

She will come out into the sunshine tomorrow for some "after" portraits - then on goes the thatch. (Let's hope I cut enough....)

Looks like she'll be ready for her journey back to the Atlantic Tidewater by Sunday....

As ever, posts to follow.

SJS
 
So, after scrolling through a couple hundred jetski trailers pics, I have yet to find one that employs this bow roller configuration. Who make these?
 
Last edited:
Good morning, RL~

I wish I knew! It is the perfect chock for lots of gunning boats.

I will start a separate thread.

SJS
 
Here's a bunch more steps - just about done.....


After bolting in the new lifting handles at the stern, I filled the "cavities" with insulation foam.


1%20Handles%20-%20excess%20foam_zpsjw2tvckv.jpg


The Beckson Deck Plates - 4-inch size - are set in silicon caulk.

2%20Beckson%20installed_zpselfezgkj.jpg


It's a good practice to have an easy way to inspect sealed chambers in any boat.

Note, though, the crack in the 'glass tape just below the plate. It explains why I found water in this chamber when I first cut into it. Earlier tonight I patched the crack with 3 layers of 'glass cloth set in epoxy.


3%20Beckson%20with%20plate%20-%20note%20crack%20in%20tape_zpsimllqaji.jpg


Four turnbuttons hold the 2 floorboards in place. They are sealed with epoxy and one coat of varnish. No tools needed to remove the floorboards.


16%20P%20-%20Aft%20turnbutton_zpslygxjvwa.jpg


The slots in the gas tank chocks allow the turnbuttons to be turned.


17%20%20P%20-%20Gas%20Tank%20and%20fwd%20turnbuttons_zps4zuthlac.jpg


The gas line is protected within a length of 3/4-inch CPVC pipe near the cockpit.


17a%20Gas%20Tank%20-%20line%20protection_zpsnka2skzd.jpg


Two plumbing clips hold it in place.
17b%20Gas%20Tank%20-%20tubing%20clip_zpsegul2gfh.jpg


The pipe is simply snapped out if any work needs to be done on the fuel line.


17c%20Gas%20Tank%20-%20pipe%20in%20place_zpsa754hib0.jpg


The cockpit cover/hatch had a small but structural crack up forward. I enlarged it with a Dremel.


7%20Hatch%20-%20ground_zpsg9xs3ztt.jpg


I used thickened epoxy plus 1/2-inch 'glass fibers - to approximate the mat texture of the hatch.

8%20Hatch%20-%20sanded%20repair_zpsytbxmbyh.jpg


Sanded and painted.


9%20Hatch%20-%20repair%20painted_zpsbuo5m2o3.jpg


Although the hatch is symmetrical fore and aft, I created a "front" when I added cleats. So, the white arrow helps when covering the boat in low light.


10%20Hatch%20-%20forward%20arrow_zpssaovpw5a.jpg


I reused the nylon cleats from the decks. They now provide a way to lash each side of the hatch down securely and quickly. I spliced a length of spun polyester rope for each cleat. It's my favorite kind of rope because it splices well and resists rot much longer than Manilla. I just wish it was made in O. D.


11%20Hatch%20-%20Keeper_zpsmoxfop0e.jpg


Here's a good idea - not mine - for 'glass hatches. The foam boards ensure it will float if it winds up overboard. I added the black forward arrow. You can also see the backer blocks for the cleats.


12%20Hatch%20-%20underside_zpsgq9hfvmb.jpg


I also made a new handle - the old one just wasn't streamlined enough!


13%20P%20-%20Hatch%20handle_zpso1gibzhb.jpg


The "keepers" run through the bronze eyes then get lashed back on each cleat.


14%20P%20-%20Hatch%20keeper_zpsbgovlwrr.jpg


A duck's eye view.


15%20P%20-%20Hatch%20secured_zpsqy3np1nc.jpg


Here it is ready for the rigors of the NYS Thruway.....


26%20P%20-%20Hatch%20secured%20Stbd_zpsqylblpik.jpg


I spliced a new painter onto the eye strap.


18%20P%20-%20Nose_zpsjlflo5hy.jpg


Unlike the original, it cannot reach the prop if it goes overboard.


18c%20Painter%20-%20short%20enough_zpsl6gype22.jpg


The wary and discriminating Black Duck is a sucker for Flemished lines....


18a%20Painter%20-%20Flemished_zpsi0zwnanr.jpg


Here is the rubber keeper for the threaded post that holds the battery-powered bow light.


19%20P%20-%20Bow%20light%20base_zps5nqedin2.jpg


Here it is with the flap-boards up - in gunning position.


25%20P%20-%20Wings%20up_zpstxrx3okh.jpg


Here is my pushpole in the chocks on the starboard flap board.


22%20P%20-%20Pushpole_zpshjmhhy21.jpg


Flapboards down and out.


21%20P%20-%20Wings%20out_zpsmzgewdmc.jpg


Notice how they are angled slightly above the horizontal - to hold decoys when rigging.


20%20P%20-%20Bow%20on%20-%20wings%20out_zpsgpu30pzi.jpg


The rehabbed motorboard is ready for the Merc 20.


23%20%20P%20-%20Motor%20board_zpsfxdclfly.jpg


The new handles should come in...."handy"?....when the tide runs out.


24%20P%20-%20Stern%20handles_zpshia0rvua.jpg


Ready for thatching.....


27%20P%20%20Three-quarter_zps32shwnco.jpg


All the best,

SJS
 
Has to be the nicest southbay around now. Steve your attention to detail is what really sets all your projects apart.

I'm interested to see how the framed flapper boards work out once grassed up. Never seen those before.
 
Good morning, Craig~

Thanks for the kind words.

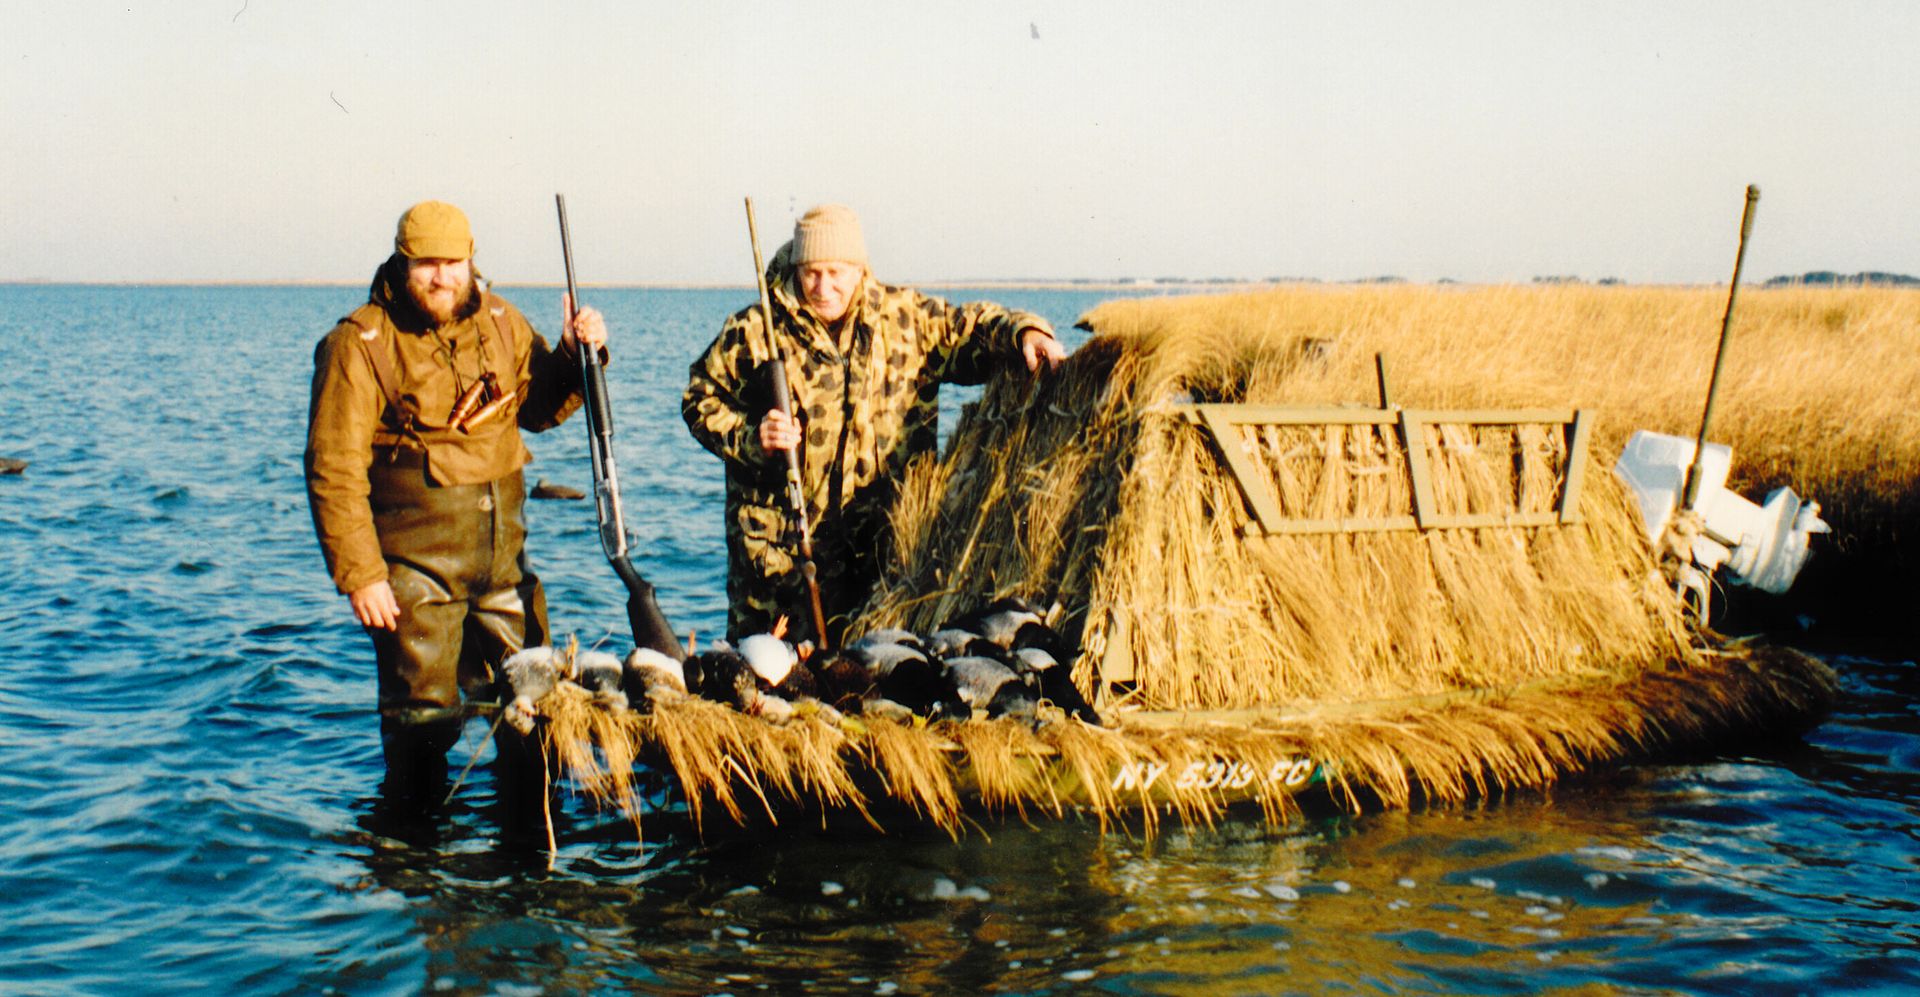
I used these framed "flapper boards" on this blind that I put on my Sneakbox to bring my Dad along. We sat on buckets and shot athwartships. They worked well for many years. Gunners can peer through the bundles of grass as the birds approach.

SJS%20Sneakbox%20%20Blind%20-%20early%2090s%20south%20of%20Thatch_zps2rsiakka.jpg


I hope Bill likes them on his boat. He sits up - on the floor - and shoots athwartships. I am hoping they improve his hide AND give him the ability to watch incoming birds as we did. We usually kept the shooting-side flap down until we saw birds interested in the rig - then slowly raised it until it was time to come out with guns ablaze.....

All the best,

SJS
 
Great Thread Steve. I'm just seeing it now been busy with a new 8 week old Chessy pup. What did you think of the thatched triangular grass boards Jim Rochford had on the bow of his Southbay grassboat if you can remember. They layed flat but could be opened up to store items like bags of goose shell decoys even when underway. I don't know if they upset your idea of the lines of the boat but they seemed like a real usefull addition kind of like a decoy rack for the bow. We never lost anything up there but would use it for more replaceable items like bags of plastic shell decoys or foamers I guess, never the corks. I guess a picture would be most helpfull but wondering if you remember and your thoughts.
 
Good morning, Pete~

We discussed forward 'boards as a possibility. The plan now is to simply lash decoy bags up there as needed - which is what I did on my Sneakbox for many years. The forward and midship cleats can serve this purpose.

BUT, I read Steve Sutton's cautionary tale with grave interest. IF anyone is in conditions where taking heavy seas over the bow is a possibility, open-topped decoy bags could certainly hold water for a dangerously long time.

All the best,

SJS
 
That definitely seems like a great design, both in allowing taller flapperboards and being able to still see out from behind them!

Being that we hunted a lot of marsh with taller cord grass we ran a bungee cord along the flapper boards and the forward spray shield and then would add longer grass as we saw fit for extra concealment.

It also worked well for displaying a good shoot!

dixiecrusier.jpg


Here's a shot I found just for you Steve, you'd think this was straight out of the Great South Bay, but it's here in NJ and it appears there's an Al McCormick style black duck decoy in the foreground.

This was before I started gunning, but I'm still using those teal decoys in my rig today.

IMG_4599.jpg

 
Bill~

Almost in the clubhouse! She's all thatched (almost....) and ready to hunt - or at least be hauled back to salt water. I still want to trim the belly strap to size - first thing tomorrow morning.

Here are some odds and ends, a "creative" storage experiment, the hay, and then the new trailer lights.

Not long after I mounted the stern light on the high point of the Merc I realized there was a much more protected spot just a bit aft. So, now the threaded post is down, out of the way, by the handle. I filled the first hole with a brass machine screw and a washer.

IMG_5016_zpspmcqalen.jpg


Both of the nav light posts get protected with lanolin beneath their rubber boots.

IMG_5026_zpsvpgzvsb2.jpg


We will probably make a taller spray dodger next year. In the meantime, I cleaned up all the snaps on the factory dodger - and all the snaps on the coaming. The little wire wheel on the Dremel did a nice job, BUT....the canvas had shrunk and I could not get it to fit on the coaming snap studs. I may try soaking it in warm water and see if I can stretch it back to its original length. In any event, the dodger is very low and cannot be gunned out of - nor leaned on for support when under way.

Dodger%20clean-up_zpshobl1n0c.jpg


I got the idea for this "storage bin" when crawling around inside the cockpit, installing the fuel line. Since the gas tank is now up forward, the area beneath the stern deck offers lots of storage space. But, it can be less than handy when everything bounces aft and piles up against the bulkhead - along with a bunch of bilge water. So, I made this bin to fill most of the space - but can be pulled forward like a drawer for access. It is not attached to the boat. It just wedges in against some hardware - and will tend to stay there (I hope!) from the motion of the boat. It is set back a few inches behind the aft coaming and its bottom is sealed and waterproofed - so its contents should have a good chance of staying dry. I will look forward to the after-season reports.....


Stern%20bin_zps7fhtur0l.jpg


I thatched the boat inside the shop - being careful not to have the stove going with the hay inside where it would dry out. Most of it gets wedged beneath the thatch rails and is held by tension. I used the baling twine to lash bundles to the flap-boards and the motor cover. I like the natural twine because it can be cut off and discarded along with the hay after the season.


Thatching%20twine%20etc_zpsv7exs6di.jpg


The chain hoist allowed me to get this big 4-cycle onto the boat single-handed. No way otherwise.....


Motor%20lifting_zpsr13esyxr.jpg


Here it is all thatched - ready for just a haircut. ALSO, though, I did not have enough hay (mostly Smooth Cordgrass - Spartina alterniflora, actually) to complete the job as envisioned. Bill with have to enlist some Youthful Sidekick (and duckboats.net member) to cut another armful of grass and double the number of bundles on the flap-boards.

When I had similar flap-boards on my Sneakbox blind, we always shot over the port side. So, the starboard flap was solid plywood and only the port flap could be peered through. The solid flap was on the upwind side - for warmth - and also gave a better background to hide our silhouettes. Both flap-boards on this South Bay are of the "porous/peek-a-boo" type - so either side could be gunned.


Thatch%20uncut_zpstx5i0ri3.jpg


Most Cordgrass is long. Good for hiding the boat but not as durable as true Salt Hay (Spartina patens). Since this vessel will travel the NYS Thruway long before it gets to salt marsh, I gave it a haircut.


Thatch%20needing%20haircut_zpsqnbo6vji.jpg


I think Robert Ruark would advise me to "Use enough gun!" for this task.


Thatch%20haircuttung%20scissors_zpsxxyjkl8y.jpg


Still plenty long, but less susceptible to being pulled out by highway forces.


Thatch%20after%20haircut_zps1epnbxmd.jpg


All done - but it still needs more "hide" on those flap-boards.


Thatch%20after%20cutting%20full%20portside_zpse4gkceap.jpg


The bundles are slid in behind the tarred decoy line and then lashed to it - with a square knot in the baling twine.


Thatch%20on%20flapboards_zpst0gqevra.jpg


On the motor cover, the bundles are lashed to nylon webbing.


Thatch%20on%20motor%20cover_zpsrijhbtwa.jpg


I could not repair the existing tiller extension - so bought a new one and painted it with Rustoleum Camo spray paint - 3 or 4 coats.


Note that the new painter cannot reach the prop - and can be secured to either stern cleat when not in use. I am trusting that the too-white color will soon be bathed with that rich mudflat "potion" so readily available on the low tide.


Thatch%20and%20Painter_zpsgehx67dj.jpg


Three of the 4 lights did not work when I tested the trailer on my car. Rather than fool with bulbs, wires, etc, we opted for a new set - and went to LEDs. I also upgraded the mounting hardware to stainless and the electrical connectors to shrink-tube type.

Trailer%20light%20upgrades_zpszsihxqa0.jpg


The LED kit did not include side markers - neither of which worked - so I replaced those with conventional bulbs.


New%20lights_zpssjab6m4z.jpg


I am now looking forward to photos of her back on the Bay.

SJS
 
Bill~

All the last details are now wrapped up.

Here is the Stern Bin - for dry storage. This is it out in the daylight - pulled forward into the cockpit - where you can get to its contents:


Stern%20bin%20-%20out_zpsph51deml.jpg


Here it is wedged back beneath the stern deck - away from most rain and spray - and watertight to keep out bilge water.


Stern%20bin%20-%20in_zpsjtyfnbg9.jpg


I also shortened up the belly strap - I cut and re-sewed it.


Belly%20Strap%20sewing_zps9xqyslaw.jpg


It will no longer be wrapped around the trailer frame - so no more need to worry about chafe.

Belly%20strap%20stbd%20hook_zpseilbfsqq.jpg


There's just enough left over to tie off. The cam buckle remains in a convenient location.

Belly%20strap%20-%20port%20side%20lever_zpsuvdzza0y.jpg


Here is my latest brainstorm. This is a "weather cloth" that can be snapped onto either flap-board - depending upon how you rig. It is intended for the windward flap - and will keep you much warmer and also hide your silhouette , especially when you are backlit.
Weather%20cloth%20-%20full_zpsdkalmc1r.jpg


It is held in place with 6 Lift-the-Dot snaps. Each flap has 6 posts to receive it. It should take about 30 seconds to switch it from one flap to the other.


Weather%20cloth%20-%20fasteners_zpssz1mzsjg.jpg


Here it is rigged with the "shooting flap" up. I would still lash a few more bundles of grass to each flap-board - but I would keep the view fairly open right in front of the gunner.

Weather%20cloth%20%20shooting%20flap_zpsxjoygi4b.jpg


One last detail. This is a "keeper" to hold the flap-boards up while under way. It comprises 4 eye straps - 2 on the top rail of each board - and 1 shock cord with hooks. (I could not bring myself to paint the brass straps or the bronze screws. Both will oxidize to a gorgeous verdigris soon enough in the salt environment.)


Flap-board%20keeper%20-%20eye%20strap_zps1plboefe.jpg


Here it is in the stowed position. It can be stowed on either windward or leeward flap.

Flap-board%20keeper_zpsa7iz3d5k.jpg


And here it is deployed.
Flap-board%20keeper%20-%20deployed_zpsajxuxbuk.jpg


See you soon!

SJS
 
Bill~

I'm glad you like that weather cloth - it's what comes from lying in bed thinking about duckboats all night long....

SJS
 
Back
Top